

Looking for audio clean-up tips for Premiere Pro or After Effects? Here’s how to fix noisy audio and video in no time at all.
Top image via Shutterstock.
Whether you’re in the business of editing or shooting, noisy footage is one of the most frustrating roadblocks you can encounter in your workflow. Though you can’t make the footage picture perfect, you can improve the quality of video and audio enough to where the audience won’t notice it. The magic of filmmaking always lies behind the scenes in post-production. Here are a few simple steps to follow for correcting noisy audio and video in Premiere Pro.
Cleaning up Noisy Video
So for this quick fix we’ll be working in After Effects. So, select the clip you want to work on, right click and hit “Replace with After Effects Composition.” This will open up After Effects. Then, go to “Effects” and select “Remove Grain.” Drag this onto your composition and then go to the “Effects Controls” for the “Remove Grain” effect. This is where you’ll be able to increase the “de-noising” of the clip by increasing the “Passes.” I suggest playing around from here to see what looks best for your clip.
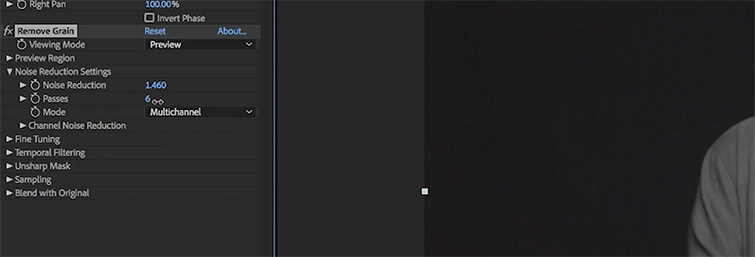
Once you’ve done this, the composition will automatically sync in Premiere Pro, so you can keep editing. This effect is render-heavy so you might want to render out once you’ve done this (depending on how long your edit is). If you’re still having trouble playing the clip in Premiere Pro, export the clip from After Effects then bring it back into Premiere. This should do the trick.
Clean up Noisy Audio in Premiere Pro
So instead of working in After Effects, this time we’ll be moving our intended clip over to Audition. Once you’ve opened Audition take the “Time Selection Tool” and select a piece of the track that is just room tone (no dialogue). To do this you can just click and drag out the section of the clip you want. Now go to Effects>Noise Reduction/Restoration>Capture Noise Print. What this does is take the piece you’ve selected and identifies background noise. That way it can remove the sound from the rest of the clip, but not the dialogue.
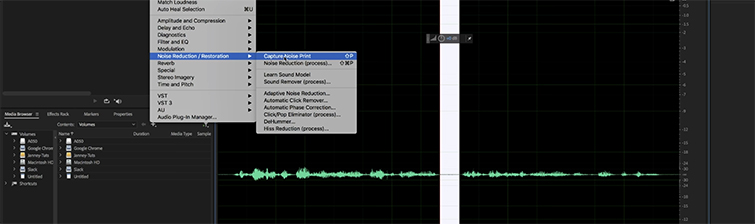
Now, click anywhere on the timeline, then go back up to Effects>Noise Reduction/Restoration, and hit Noise Reduction(process). This is where you’ll begin to play with the reduction of the noise. You can increase or decrease the amount of noise reduction, or play with the decibel levels. It’s entirely your choice. Just play around with it enough so that your clip sounds the way you want it to. Once you’ve successfully removed the noise, send the clip back to Premiere by hitting “Command+S.” This will place the altered clip right back into your timeline as it was before.
posted on PremiumBeat


One thought on “How to Clean up Noisy Video and Audio in 30 Seconds”
Great insthgi! That’s the answer we’ve been looking for.