
Lighting Tips for Home Photography
Professional photographers use the control and manipulation of lighting to achieve expert quality images. By learning how to manipulate lighting for photography at home, even non-professionals can achieve the best possible outcome.
This article will explore specific photography lighting tips that may assist novices and professionals alike.
Importance of Lighting for Photography at Home
When it comes to photography, lighting is crucial to the outcome of an image. How an image is lit can determine brightness, darkness, tone, mood, and atmosphere. By manipulating light correctly, the photographer can control the texture, vibrancy, and luminosity of an image and its subjects. Furthermore, the distribution of shadow and highlights allows the photographer to create a more professional looking photograph.
Professional photographers use specific lighting techniques to avoid blurred and grainy images. By manipulating light and camera settings, a photographer can create whatever kind of image they choose.
How Sunlight and the Time of Day Can Affect an Image?
Lighting can be achieved through both manufactured and natural means. Natural light, or sunlight, is an invaluable source of lighting when it comes to photography, as the images taken in sunlight appear brighter, and more natural. On a clear day, sunlight provides good light coverage, all from the same direction, to highlight the subject. Photographers can use specific times of day to achieve the desired effect on an image.
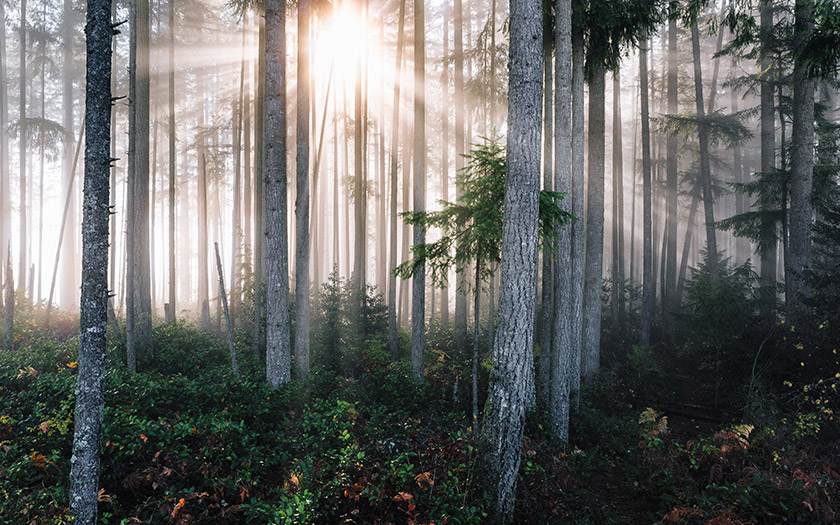
Photographs taken during midday, with unrestricted sunlight, will create sharp photographs with bright color and full detail. However, during the first and last few hours of the day, sunlight will shine through the atmosphere at a different angle, creating a softer quality to an image. Depending on the type of photograph being taken, sunlight can be used to enhance the overall quality of the outcome.
How Low Light Can Affect and Image
Low lighting can be difficult for a photographer to work with. Often when the light is low, one would need to use a flash to light the subject while taking the photo. This often results in the subject being washed out by the harsh light from the flash. However, by not using the flash, images can often appear grainy and blurred, resulting in indistinct objects as the subject matter.
When considering room photography in poorly lit areas or at night, it is advisable to change the camera settings to compensate for the poor lighting. Set the ISO higher to ensure that the camera shutter will take enough light to produce the image. Mounting the camera on a tripod will assist in avoiding camera movement, in ensuring proper light filtering and better quality images. It is important to note, however, that it is very difficult to take sharp images in poor light.
How Reflected Light Can Affect Photography
Professional photographers use reflected light to reduce glare in their images. The light that shines directly onto an object or a person has the potential to create a “hot spot” within the image. This “hot spot” can decrease image quality. Photographers create reflected light by shining a light source against a wall or board, bouncing the light towards the subject, and covering them in an even, diffused light. This light can be angled to meet the exact requirements of the photographer.
Reflected light can be moved closer or further away from the subject, to change the shadows and create different atmospheres. Photographers who specialize in portrait photographs prefer to use reflected and diffused light, as opposed to sunlight, as it gives them more control over their lighting choices.
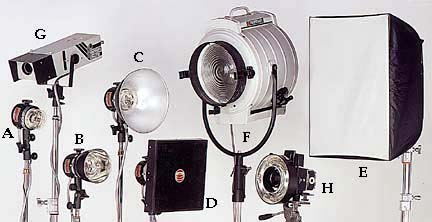
- Use Professional Lighting AssembliesA professional lighting assembly consists of a cover, a housing attached to the cover, and a lamp base. It contains a circuit board within the housing, with multiple lights attached. A heat sink is attached to the lights, to ensure that overheating does not occur. Photographers can program this assembly to emit the exact level of light that they require, and direct the light where it is needed. These lighting assemblies are easy to control and will create the desired effect.
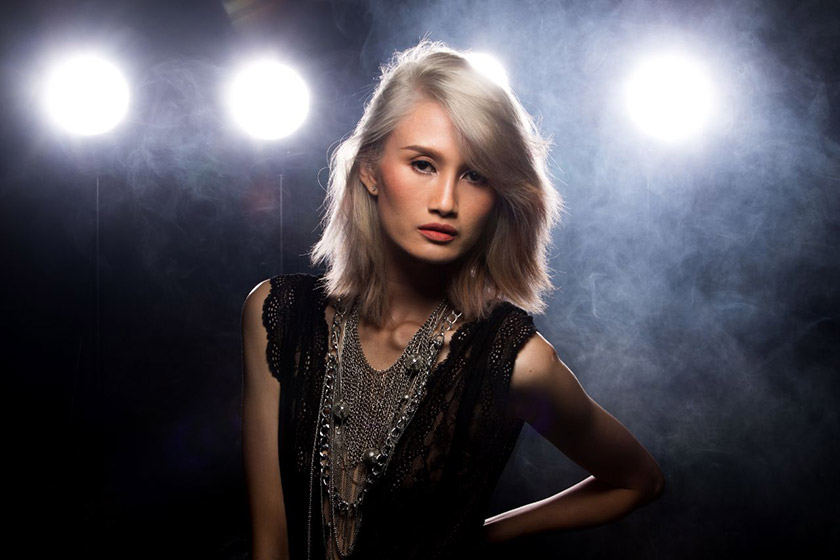
- Learn to Control Angles and High Contrast LightWith minimal equipment, professional results are still achievable. It is recommended to avoid using a single flash head, as the angle will create a strong light that emphasizes uneven skin texture, and creates stark shadows and highlights. A diffuser can be used to soften the light, avoiding high contrasts and uneven lighting across the subject. Without managing the angle and high contrast of your lighting, shadows will appear deeper, and image quality will be poorer.
- Use Reflectors and Diffusers for Low Contrast LightDiffusers shaped like opaque umbrellas create lower contrast light. This light allows for larger bursts of soft flash, dispersing the light, and making the image softer and more interesting. Use diffusers at 45-degree angles to achieve this effect. To reduce visible shadows, position a warm-colored reflector near the subject, as this further reduces contrast in cool tones. Low contrast light achieves an overall softer image.
- Learn to Use High Contrast LightHigh contrast light will help to emphasize the characteristics of the subject. However, it can result in deep shadows. Place the light at a less acute angle to ensure that it does not emphasize skin texture. Make sure to use a reflector to illuminate the side of the face that is not in direct light, unless you require the part of the face to be silhouetted.
- Use Diffused Light With a ReflectorUsing diffused light combined with a reflector will highlight the three–dimensional nature of your subject, without creating a high contrast or deep shadows. It is recommended to use a reflector that is bright white or silver, as they create the biggest subtle difference between the parts of the subject that are lit and the parts that are reflected. This type of lighting creates depth, and holding the reflector further away from the subject will deepen shadows. The position of the reflector will achieve different lighting effects. Therefore, it is recommended to experiment with positions before taking a picture.
- Place Rim Lighting Behind the SubjectTo focus on the outline shape of your subject, the lighting can be placed behind the subject. This will create a rim-lighting effect. Decrease the flash power to avoid stark silhouettes, and use a wide aperture. Reflectors can be used to shine the light back on the subject, further decreasing silhouettes.
- Use a Clamshell for Professional Beauty ImagesClamshell lighting setups can be used to achieve professional-quality beauty images, as the lighting is flat and even. To achieve the effect, place two softboxes on either side of the subject, maintaining an equal distance. The power-on each light should be the same, and a reflector should be used to reflect light on the subject’s face.
Equipment and Accessories to Assist with Lighting for Photography at Home
To ensure the best possible lighting for at-home photography, the following equipment and accessories are recommended by professionals:
Equipment:
- Lighting units – RBG, or red, blue, and green LEDs combine these three colors to produce a multitude of hues of light.
- LEDs with a color temperature – Use of a 160 LED lamp with 3200K color temperature, or a 160 LED lamp with 5500K color temperature allows for natural color restoration.
- Canon 600EX-RT Speedlight – This is a powerful flash with a built-in remote trigger system, allowing for lighting control from up to 30 meters. It has an integrated optical receiver, with white-balance correction filters, and bounce-and-swivel control for the 20-200mm zoom head.
- YN600EX-RT – This Speedlite from Yongnue is compatible with Canon’s 2.4 GHz radio flash trigger system and E-TTL / E-TTL II metering, as well as Nikon flash systems. It provides a powerful guide number of 197′ at ISO 100 and 200mm, an impressive zoom range of 20-200mm, and a wide-angle panel for 14mm coverage on full-frame cameras. Furthermore, it features wireless and optical pulse triggering.
Accessories:
- Manfrotto 5001B 74-Inch Nano Stand – This aluminum Nano stand is compact and easy to use. It has five sections and four risers and attaches to most cameras.
- Manfrotto 026 Swivel Lite-Tite Umbrella Adapter – A universal umbrella mount that works with any flash head and light stand. It is strong and lightweight, allows for full rotation, is easy to use, and includes compatible and removable studs.
- Westcott 45-Inch Optical White Satin with Removable Black Cover Umbrella – This umbrella is easy to use and carry. It reflects more light than its counterparts and is affordable. It is compact and easy to assemble and disassemble.
- Flash Honeycomb Grid – This is used to create a tight, focused beam of light. The focus is not as intense as a snoot. Honeycomb grid light modifiers are used for precise work. For this reason, the need to create the right shape, size, and intensity of light will need to be subject to experimentation.
- Flash Gels Filter Kit – Used to improve overall color balance by adjusting the color temperature of the flash. It allows for better ambient light source matching. They attach quickly to the flash with silicone bands. By white balancing your camera, and color balancing your speed lights, you will have consistent and uniform color in mixed lighting environments.
Recommended Cameras for Home Photography
All cameras have different specifications that can affect the quality of the photographs of novices and photography businesses alike. Here are some examples of recommended cameras:
- Fujifilm X-T30 – This camera features a dial-based operation and a compact, lightweight body. It uses the latest generation APS-C sensor to produce high-quality pictures. It includes a touchscreen rear LCD panel and a well-hidden, built-in flash. Furthermore, it connects via Bluetooth, WiFi, USB, and HDMI.
- Canon EOS 250D / Rebel SL3 – This is the smallest and lightest EOS DSLR available on the market, and features a 4k recording capability, Dual Pixel CMOS AF, and a vari-angle LCD. Its 24.1 Megapixel (APS-C) CMOS sensor combines with the powerful DIGIC 8 Processor for optimum performance and results.
- Sony Alpha A7 III – Featuring a Full-frame 24.2MP Back-Illuminated Exmor R CMOS image sensor with evolved image processing, and a wide ISO range of 100 – 51200 and 15-Stop Dynamic Range at low sensitivities, this camera responds well to continuous shooting. The upgraded operability and functionality include a joystick for adjusting focus points, Dual SD Card Slots, SuperSpeed USB (USB 3.1 Gen 1), and a USB Type-C Terminal. Furthermore, it features High-Resolution 4K movie shooting and the longest battery life of any mirrorless camera.
Final Photography Lighting Tips for Home
Here are some parting photography lighting tips to consider before proceeding with a home photography project:
- Increase Shutter Speed to Avoid Camera ShakeUsing a faster shutter speed makes it easier to avoid camera shake. The longer the lens, the greater the need to increase shutter speed. Use a minimum speed of 1/focal length. For example, a 200mm lens will need a shutter speed of at least 1/200th. To calculate the correct speed, use your lens’s effective focal length, established by multiplying the focal length by your camera’s crop factor. Avoid setting a shutter speed faster than the camera’s specified sync speed.
- Use the Correct Flash PowerIt is recommended that 400Ws flashes are suitable for home studios with a larger workspace. Smaller spaces require less power. 400W flashes are useful for portraiture photography, or larger groups of more than six people, and larger projects that require stronger lighting.
- Use Manual Mode for PhotographyChanging from automatic to manual settings will allow the photographer more control over their images. Use the histogram and LCD to assess light exposure and effects. The camera’s dials can be used to change the power of the lighting and aperture, to alter the exposure as needed.
- Make Sure to Sync the Lights and the CameraUsing a sync cable, or a wireless trigger will connect your camera with your lighting assembly, to ensure that, as the shutter is pressed, the lights trigger at the same time. The trigger attaches to the camera’s hot shoe and includes a PC sync port. Furthermore, the PC sync port allows for off-camera flash, enabling the photographer to determine the correct distance for the shot, without limitation.
- Proper Indoor Photography Lighting Enhances Image QualityWhether you are a photography hobbyist, or you run a photography business, it is essential to abide by the necessary science of indoor photography lighting. Furthermore, when it comes to outdoor lighting, any photographer will benefit from understanding how natural light and lighting angles affect the outcome of an image.
As lighting holds a very important factor in photography, it can either make or break the photographer’s efforts. Following the above photography lighting tips would enhance your photography skills, helping you to produce professional quality images. Another important determinant is the photo editing skills which adds life to the images. You can hire smart photo editors to help you get the enhanced images.
Posted on SmartPHOTOeditors


4 thoughts on “Lighting Tips for Home Photography”
It`s very important and prominent content please keep up. Thank you so much for it fromphoto editing company</a
That’s a great post.Thank you so much for it fromecommerce image editing company.
I think this is one of the most vital information for me.
And i am glad reading your article. But wanna remark on some
general things, The website style is ideal, the articles is really
great : D. Good job, cheers
Regards
Ross Alisha
Very helpful Information and Keep Sharing More. If you want learn more Hair Masking Using Photoshop