
How To Start Your Photography Business Studio At Home Q&A: Tips From The Experts
Starting your Photography business studio at home could be quite a challenge. You could be wondering what camera to buy or what equipment is the best to take great photos. Using your home for starting your studio could be a great idea to save money and time. We have reached out to some of the most amazing experts, and we asked them some questions about how to set up your studio at home to share their expertise and help you out with this great experience.
What are the benefits of setting up a photography studio at home?
What’s the holy grail for you, as a photographer? I have no idea because my holy grail is 100% different from your holy grail. For some people, it’s a lens or a location. Others want to get paid. But for a lot of us, it’s a little space we can call our own studio. I can guarantee that a home studio is much more attainable than it seems on the surface. For you to understand my perspective, you need to re-think what a studio is. What’s easy to forget is; that if the story or the subject is powerful enough, the surroundings don’t matter. All the space should do is lift the subject up, and enhance it. Cleverly placed bedsheets are a powerful tool, and I can tell you that bedsheets have appeared in more than 1 glossy magazine shoot, courtesy of this guy.
There is a term in filmmaking called ‘cheating’, which is essentially where you cut corners to get the desired frame. There is no studio in the land that hasn’t had to cheat, so why shouldn’t we? If you have a space that can be opened up into a studio – and I’m only taking; the empty corner of a room, or half a garage… Then you, kind of, already have a studio. What you do with it is where the value is, and that’s the fun part. You can go as small, or big as you like. Full-blown lighting frameworks on the ceiling, with an infinity wall setup, or bedsheets held up with blu-tack and a vintage lamp for lighting.
My point is. Don’t get hung up on the sophistication of the thing, just have a go!
Ben Waugh Marketing Manager www.ClickASnap.com
What should you keep in mind when choosing the best space for a photography studio at home?
One of the most important things to consider when choosing a photography studio is how much natural light the space receives. No matter what type of photography you shoot, having the option to use natural light is always a huge plus. I recommend you make sure the space has plenty of windows or other sources of natural light. If you have the option, check the space at different times of day to get a better feel for the potential lighting conditions.
The next thing to keep in mind is the layout of the room. You need to make sure there’s enough space to set up your equipment and take pictures without being cramped. Is there enough room to photograph your subjects where the room gives the best light? You’ll need to visualize all your equipment and setup before deciding on the space. Ensure there’s enough storage space for props and backdrops.
Finally, think about what kind of atmosphere you want your studio to have. Can you visualize yourself making awesome work here? If the prospect of working in this studio doesn’t excite you and makes you want to get to work straight away, forget it!
Emma Murphy – Content Specialist camerareviews.com
A second perspective about the best space at home
There are a few things to take into account when choosing the best space for a photography studio. The first is the size of the space. You’ll need enough room to comfortably fit your equipment, as well as any props or backdrops you might use. The second is the lighting. Natural light is always best, but you’ll need to make sure there are no bright lights or glare coming in from windows. The third is the sound. You’ll want to choose a space that’s relatively quiet, so you can avoid any unwanted background noise in your photos. Finally, you’ll want to consider the location. You’ll want to choose a space that’s easily accessible for your clients, and that’s in a safe neighborhood. With these things in mind, you should be able to find the perfect space for your photography studio.
What are the typical photography studio equipment pieces for a home studio?
Taking quality pictures is an art that can be mastered by everyone. However, since most people need some help to get started with photography, you should consider purchasing the best studio equipment for your home. Here’s a shortlist for you:
Background stand: A background stand is one of the most important things you can have in your studio. It will help you to create a professional-looking background for your photos and also make it easy for you to change your backdrop whenever you want.
Photo Background: A photographer’s background can make or break a photo, so it’s important to have one that’s properly set up and ready to go when you need it. That’s why we recommend using a background stand for any kind of studio photography.
Studio Lighting: Studio lighting is a must-have for any home studio. It can be used to create a professional studio space, or just to light up your home workspace.
Umbrella Lights: Umbrella lights are an excellent choice for small home studios because they provide plenty of light while keeping the cost down. You don’t need a lot of money or space to get started with your new studio!
Softboxes: Softboxes are the best lighting for a home studio. They help you get the perfect lighting for your portrait, product photography, and more.
Continuous Lamps: When you’re ready to start working on your next project, consider adding some continuous lamps to your studio space. These accessories will make it easier for you to create images that are both beautiful and professional looking.
Reflectors and Diffusers: Reflectors are used to bounce light back toward the subject or background. Diffusers are used to spread out the light from a primary source so that it looks more natural.
Why is lighting important in a photography studio?
Lighting is an absolutely essential part of photography. It can be the difference between a good photo and a great one. How you position the light, how many sources you use, and the intensity of your photography lighting all play a role in the quality of the photo you’ll end up with. If you’re photographing people, for example, good lighting can help bring out their features and make them look their best. If you’re shooting products, the right lighting can make them look sleek and professional. And if you’re taking nature photos, the right lighting can add an ethereal quality that makes the scene even more breathtaking.
Now, remember that light also produces shadows. And that darkness can be just as important as the light in photography. Light and shadows come together to create form, and volume, and in their unique way, could become a subject, too. Have you ever seen your shadow cast on the ground from a late-afternoon Sunbeam, low on the horizon? As the Sun sets, your shadow will get longer and longer. And as it does, you’ll notice that the shape of your shadow starts to change.
Your head will become smaller in relation to your body. Your arms will become thinner. All of these changes are caused by the angle of the light. The same is true for photography. The angle of the light will determine the shape of the shadows in your photos. And those shadows can be just as important as the light itself in creating the right atmosphere for your image. Light isn’t just for making your subject “appear”; light can also hide, distort, and manipulate the reality of what you’re photographing. It can make things look bigger or smaller, closer or farther away. Light is deceptive. Lighting is important in photography because it is empowering. It can make the invisible, visible. It can create the impossible.
Why is testing your lighting and equipment important in a photoshoot?
Doing a test run of your lighting and equipment is incredibly important for a successful photoshoot. Having professional lighting will make your photos look cleaner and crisper. It also helps you achieve the tone you want, whether warm, cool, or somewhere between. And the equipment is no different. Testing your equipment beforehand provides reassurance that everything works and you can do your photoshoot seamlessly.

Annabel Maw, Director of Communication, Jotform.
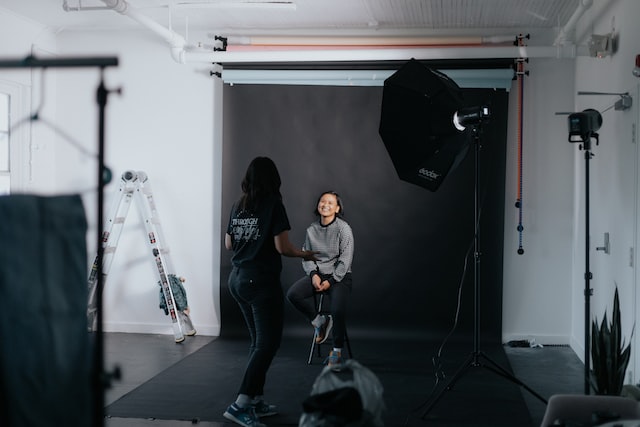
How to set up simple lighting for studio portraits?
One of the biggest challenges in setting up a home studio is space—more specifically, the lack of it. We would all love to have a large studio with a complicated lighting setup, but that’s simply not possible for most of us.
You can take that as an interesting challenge—how do you simplify your setup with minimal sacrifices in quality? This is a question that we had to grapple with at Ubersnap, because we do portrait shoots on location. Often, we would arrive at a client’s office, only to find that we had just a small meeting room to set up our mobile studio in.
Let’s talk about the conventional portrait on a white background. Most articles and tutorials will tell you that you’ll need a 3 to 5-light setup. We work with just 2 lights, and I’ll tell you how later. Here’s the conventional setup. You’ll need 2 lights to the left and right of your subject—one key light, and one fill light to lighten up the shadows. You’ll also want a backlight, to create a nice glowing edge around the hair and shoulders. What if you want your background to be pure white? Now, you’ll also need a light (or two, with one on each side) just to light the background. That’s 3 to 5 lights. If you’re working in a small room, there’s no way you’re fitting your setup.
Now, let’s talk about our simplified setup with just 2 lights. We have a key light to the left (or right) of the subject, and we use a reflector on the opposite side to fill in the shadows. Here’s the key trick—we place the second light behind the background so that the light goes through it. That means that you’re pointing the light in your direction. It then serves a dual purpose—it lights up the background so that it becomes pure white, and it also turns the whole background into a large softbox, to provide the backlight. Just make sure to dial in the power appropriately. This setup will easily fit in your home studio, and allow you to kick-start your portrait business. Try it out today and start creating!
Boon Chin Ng Founder, Ubersnap
Could you provide us with some tips when choosing a photography backdrop for your studio?
You need to consider many factors while selecting a photography backdrop. The first thing that you need to consider is the backdrop material. You can get backdrops in materials like paper rolls, muslin, vinyl, and canvas. In my opinion, paper and vinyl are two good options. The only issue with a vinyl backdrop is that it is heavier when compared to paper. A matte finish vinyl sheet will not reflect light. So, it is a very good option.
Next comes the color of the photography backdrop. In the studio, you need to have multiple backdrop options. Sometimes you need to go for a high-key image where you need to have a light color backdrop. In other cases, you will have to shoot a low-key shot. You will need a dark background for the low-key image.
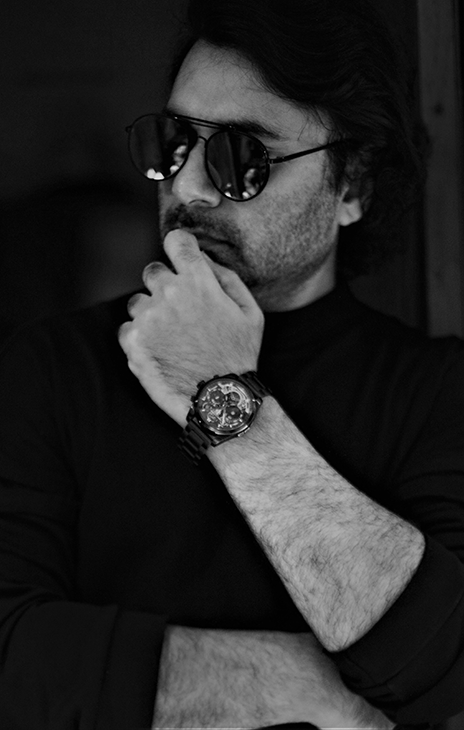
There is a direct relationship between the backdrop color and the mood of the image. When you capture headshots and want to add some mystery to the picture, a black or dark backdrop will be a good choice. You need to use appropriate lighting techniques to get the desired result.
A grey photography backdrop works best if you want less distraction around your main subject. Most fashion and product photographers prefer to go for the grey background. You can use any backdrop color. But you need to ensure that the color of the wardrobe complements the backdrop color. Only then you will be able to capture an aesthetically pleasing image.
Govind Vijayakumar, Photography Axis
What type of cameras, lenses, and accessories are the best for a photography studio home studio?
Photography studio work often involves portraits of people or pets and product photography. Full-frame cameras are preferred for studio work by professionals due to their image quality. Resolution is important in this type of work, and high megapixel cameras are often used. Full frame cameras also excel at low light performance, which may or may not be important in the studio, depending on the type of lighting used for the shoot.
Currently, mirrorless cameras are becoming more and more common as certain companies are discontinuing their DSLR production. The camera must have an accurate focusing system due to the detail expected in this type of photography, and eye tracking modes are commonly used, especially for pet photography. Studio photographers like to work in manual camera mode and enter their settings such as ISO, aperture, and shutter speed by hand, having the most control of the output image, including noise, grain, depth of field, and sharpness.
Lenses used in studio photography vary. For product photography, macro lenses are often utilized. For portrait photography, dedicated portrait lenses such as an 85mm on a full-frame camera are used. Other accessories often found in the studio include flash kits with diffusers for lighting, reflectors, wireless triggers, and gels.
What are the types of styles that you could use in a photography studio?
Depending on how big the photo studio you have access to, here are some ideas for each space. Still, life, objects, and food and drink photography are the most accessible given the constraints of the space and lighting available for the smallest studios. You can also dabble in macro photography.
You can start playing with decor and more light sources for a room-size studio. The more popular subjects would be people-centered: families, children, baby photography, and specific themed photography (birthdays, weddings, parties, etc). You can also work on your portrait photography which is notoriously difficult even for the more experimented photographers. This is a good space for you to shoot larger items such as furniture or home appliances; it is also great for table settings, food that is not in close-up, dioramas, and other niche subjects that need specific lighting.
For large studios set in industrial buildings, the possibilities are truly endless, from specific themes to shooting cars, machinery, and people at work. These types of studios are more similar to a film set than what we classically think of as a photo studio but any photographer who is lucky enough to shoot in one will tell you that it’s the holy grail of studio photography.
What type of photos could you take in a home photography studio?
A photography studio opens the world up to so many styles of photography through the combination of light, backgrounds, and props. Photography is all about the manipulation and control of light. Studio lighting allows you full control of light and can help you produce the most flattering and stunning images.
Portrait images such as business headshots, modeling/acting headshots, senior portraits, and family photography all lend themselves well to studio lighting. Controlling the light allows you to eliminate harsh shadows, create the most flattering faces, and have the freedom to be creative by incorporating the use of side lighting, soft diffused lighting, or dramatic background lighting.
Bridal portraiture or engagement photos can be beautifully lit in a studio! You have the option of traditional lighting or incorporating more dramatic lighting for jaw-dropping flair. For weddings and engagement sessions that need to be taken during extremely hot, cold, or rainier seasons, studios offer protection from the outside elements.
Product photography is most easily photographed in a studio setting. Your light is evenly distributed, the background is simple and not distracting, and you can easily photograph many products at a fast pace with consistent results.
Children’s portraiture and the ever-popular pet photography can be easily utilized in a photography studio. Within a studio setting, outside distractions are eliminated helping you to capture the best images of these easily distracted subjects! Newborn photography in a studio offers a quiet, private environment for a stressed-out mom and sweet baby to relax and really shine in photos!
Beth Gillem Dogwoodmediasolutions.com
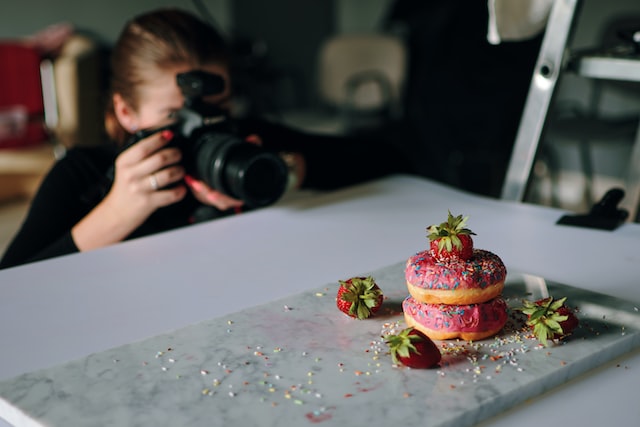
What are some tips if you want to take a photo shoot of food? Are there any special tips to consider?
Food photography is an art in itself, so you have to treat it differently than your typical photography. To photograph food like a pro, keep these tips in mind:
- Use fresh, colorful ingredients.
- Rely on natural light as much as possible – it’s an affordable way to take perfect shots without paying for expensive lighting equipment.
- Use a neutral background to make the color in the food pop.
- Include props like cutlery, plates, napkins, and ingredients to tell a story.
- Use an overhead angle when taking photos of an entire table spread and take photos parallel to the dish when you’re trying to show off height.
- Don’t be afraid to experiment with movements like pouring sauce over a steak or grating parmesan over a steaming plate of pasta.
Laura-Andreea from Oracle GloriaFood- gloriafood.com
Why is photo editing important?
I’ve met several amateur photographers (which is practically everyone nowadays) who believe that photos shouldn’t be edited and that a good photographer can take a great photo without post-production. And they often illustrate this by saying that great photos from a new phone look wonderful even without post-production. But when I tell them that the photos from the mobile phone are also heavily edited and moreover purely automatically, without the photographer’s intervention, they are quite surprised.
Post-production is important, especially if you shoot in RAW format. By photo editing I don’t mean significant retouching, that’s another chapter. For most of my photos, I only adjust contrast, white balance, exposure, sharpening, and other basic post-production techniques. You can’t make a mediocre photo great with post-production. But you can make a great photo even better. Highlight what should be prominent, and tone down what is less important.
Editing a photo is preceded by another important part of a photographer’s life – deleting photos. Especially with high-resolution cameras (40megapixels and above), photos take up a lot of space on your computer’s disk. A single photo can be over 50MB in size. That’s why it’s very important to keep only the photos that are worth something. I routinely delete over 90% of all photos I take while browsing.
What are some of the best programs or software to edit your photos?
When it comes to editing photos, Adobe Photoshop and Lightroom are of course the gold standard. You’ll be hard-pressed to find comparable programs that offer such comprehensive features and tools if you’re looking for complete creative control as a professional photographer. That said, there are still a variety of programs — many rights on your smartphone — that can do a decent job. (These days the cameras in our phones can be more sophisticated than “professional” ones of the past, and a number of photographers can take some seriously stunning photographs straight from their iPhones.)Besides Photoshop and Lightroom, some great desktop photo editing apps to check out are Pixelmator, Affinity Photo, Photopea, and GIMP (if you don’t mind a learning curve). For your phone, consider checking out A Color Story, VSCO, Afterlight, Picsart, Darkroom, and Snapseed.The most important thing to remember is that any photo editing software or app is just a tool — you’ll want to find your own unique style and use these tools to execute your vision, but you shouldn’t rely on any one app to “do the work for you.” Be sure to put the time in to learn about photo basics (composition, lighting, focus, etc.) so that no matter which camera or photo editing app you use, you can create something unique to your style.Jessica Huizenga, CMO at Frame It Easy
Quick tips to help you keep your shoot organized
Quick tips for cable management
Content creation requires technology and with that comes cameras, lights and a lot of connections. Cords strung across the floor; cables hanging off your table, can get messy and in the way. We’ve got a handful of gear management tips to help you stay organized in your studio.
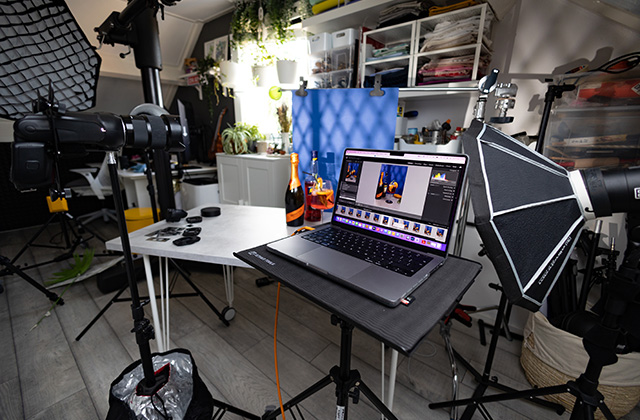
Build an efficient workstation
If you’re building a studio in your home, you’ll want to give a professional impression to the clients visiting your studio. Tethered shooting helps your client see the images and collaborate with you, making sure you’re both happy with the final results. By setting up a mobile workstation, you’ll be able to use your space flexibly for shooting and editing, as well as running your photo business from your computer.
Having a Pro Tethering Kit gives you a dedicated laptop workstation that can be set up on a Low Boy Roller c-stand or tripod roller. The Tether Table laptop mount enhances your productivity, improves efficiency, and keeps your clients at a safe distance from your camera gear when it’s time to review shots on your monitor.
Secure it with a strap
When powering your tech, no one wants to risk their power brick disconnecting from the cable, so rather than letting the cable and brick dangle, save yourself from potential damage by investing in a StrapMoore. This product is extremely versatile – holding laptop power bricks, speedlights, audio boxes, and so much more! With its adjustable straps and GripperElastic® lining the interior, the StrapMoore ensures your gear is secure and won’t slide around.
Keep your cables together
Whether routing one cable or a dozen, take advantage of coiling and grouping whenever you can to keep them tidy, out of the way, and secure at all times. With ProTab Cable Ties you can coil and secure cables or use the tie to keep cables in one line from port to port. One cable is always less of a hazard than multiple dangling ones.
Cable ties are good for storing cables, too, because the ties prevent them from becoming tangled. This works much better than tape, which can leave a sticky residue. And don’t forget – these come in a pack of 10, so you should have plenty for the job.
Versatile cable management
Whether you are looking for a way to hide cables underneath a table, secure cables for video, or want to run them along a wall or desk, TetherGuard is the way to go. TetherGuard provides increased peace of mind that cables will stay connected and equipment ports free from damage. The magnetic breakaway system gives you flexibility in locking down cable connections or having a breakaway option. Tether Guard’s Lock & Dock system is a superior way to ensure every cable stays connected, every port stays free from damage, and every shot captured is transferred securely.
How can you put together a portfolio for your photography business?
Building a portfolio is the first step toward setting up your photography business. It’s time to step out and start showing off your skills as a photographer. And creating the right type of portfolio is the key.
Here are our top 3 tips to ensure that you build an impressive portfolio:
1. Pick your best & be choosy
Don’t include similar photos but yet make sure you cover your best shots. Try to be diverse so that clients can understand how versatile you are. Too many photos can get overwhelming and eventually boring. If you find yourself picking more than you should, then include Photobooks (link: https://www.zoomin.com/photobooks) of each photoshoot, leaving your portfolio only with the best ones.
2. Layflat v/s Photobooks v/s Photo Prints
How you show your portfolio will speak a lot about you and your approach. We suggest displaying your best pictures on a classic Layflat. That said, if you want to include more pictures from a particular shoot that is relevant for that client then hardbound Photobooks work great. And should you want to include some Photo Prints then be sure to select the right finish. Skip the glossy shine and go for a ‘Pearl’ finish for a totally professional touch.
3. Ensure your first & last image is the best
Open with your best shot and also end with a profound image. If you’re not sure how your Photobook/ Layflat will look, make sure you edit and adjust the layout online. Preview the entire book before printing.
Sachin Katira, CEO & Director, Zoomin
How can start your own photography business?
The first thing you will need to do when setting up your business is to obviously come up with a name. Once you come up with one (or decide to use your own name) then you will want to create an LLC as soon as you start getting paying clients. An LLC provides legal separation so that if you get sued for any reason when conducting your business, you will not lose everything you own outside of your business. Along with this, you will want to look into insurance for your company and gear. These are certain things you can wait on; however, you never know when you may get unlucky so I am a huge advocate of doing these things earlier than later.
Getting your brand visibility is one of the most difficult things to do when first starting off and is where many people fail to succeed. You will want to first get a good portfolio of photos so I’d recommend doing free or low-cost shoots for friends and/or family to gain some work that you can show off. An even better strategy that I employed myself is to reach out to professionals in your area to see if you can second shoot or assist them. Make sure you can use the photos you capture while working with them to boost your portfolio and gain valuable experience. While working with them, ask them all the questions you may have so that you have a great understanding of how they became successful.
From there, you will want to start posting your work. There are many ways to get your work out there for free and some options are paid but can still work as well. The best free options are to use Instagram and Facebook; however, these do require that you post new work consistently. My personal favorite is a website. I personally built my own website using Squarespace and have worked very hard to get my website on the first page of Google. I also have worked hard to collect reviews which also land me on the first page of google maps which is always displayed at the top of the search page when searching for photographers in my area. Websites are amazing because you do not have to post work regularly and can just do yearly updates if you wish once you are on the first page.
Once you have reached this point, you will want to further build your brand by gathering reviews, posting new work, getting to know other professionals, and making every client’s experience one that they rave about. Over time, you will see your referrals grow and people will start to recognize you and your brand.
Zach Nichols – Zach Nichols Photography
How to attract customers to your photography business
As a product and food photographer, I get to work with a variety of clients, from local businesses who come to my studio to larger brands that send me their products or recipes and work with me remotely. I use various channels of acquisitions to find customers:
Online portfolio
Every photographer should have a well-curated online portfolio. There are lots of online platforms that allow the creation of a portfolio in a short amount of time. It doesn’t need to be perfect, but it absolutely needs those 3 things:
- A selection of your best work, that fits the type of work you want to do (ie, don’t include portrait work if you just want to focus on product photography)
- A well-thought-out SEO strategy. Think about the keywords that your customers would be using to find you online. Those keywords should be found in all the pages’ meta descriptions, as well as in the names and meta descriptions of the images displayed in your portfolio.
- A contact page with your name, your location, and a way to reach you (preferably both your phone number and email address), followed by a contact form.
Google My Business listing
Having a complete and up-to-date Google My Business listing with customer reviews is crucial if you want to be found by local customers (it’s free to register). If a customer searches for a photographer in your area, Google will display a list of the pros with a Google profile at the top of the page. A lot of photographers don’t bother asking for a Google review, so just 2 or 3 five star reviews will help you stand out from your competition.
Cold pitching
For the larger brands, you will need to put your name out there and reach out to them (or their PR firm) directly. I suggest establishing some form of relationship beforehand, either through Instagram or LinkedIn, before you reach out to them with a personalized email.
Don’t mistake a lack of answer for a no. People are busy and not all emails get seen. Follow up a few times (but don’t hassle them) until you get an answer.
Networking
If you are just starting your photography business, chances are your first client will be someone you know or somebody who knows someone you know. So don’t be shy and make sure to tell your contacts about your new business and what type of services you offer. If you are a more seasoned photographer, professional events like conferences, trade shows, and portfolio reviews are great places to make connections with potential clients, agents, or other photographers.
Returning clients and referrals
I have kept the best for last, and this is definitely the way that I get most of my customers: clients that have already worked with me and reach out when they have a new project, as well as new clients that have been referred to me by previous clients.
This is a very important and intentional part of my business model: I spend a lot of time creating and perfecting an exceptional client experience. I make sure that my customers always feel taken care of and always know where we’re at in the project. Simplifying things for my customers and making sure that I’m always on top of my communications create happy and confident clients that become my biggest advocates.
Fanette Rickert, Food + Product Photography, CEO & Owner Frenchly Photography
How can you use social media to promote your photography studio?
If you own a photography studio and you’re not producing volumes of content daily, you’re choosing to fail. Every single social platform is in a constant state of content consumption; these platforms are packed with people hungry for quality content. If you own a photography studio, you have a content production studio (some things most influencers dream of). You have the tools and knowledge to produce endless high-quality content. You should publish multiple content pieces across every platform if you want to succeed.
How can you use digital advertising for your photography business?
Effective advertising is one of the best ways to grow your audience as a business owner, but in the saturated photography market, fending off the competition can be tough. However, with a growing number of consumers turning to online channels when searching for a photographer, establishing the right digital advertising strategy can help your work to stand out from the rest. So, what steps can you take to successfully use digital advertising for your photography business?
First things first, you need to truly understand your audience. Who are they, and what are they looking for? More importantly, how can you use digital advertising to make their customer journey perfect? Once you understand your target audience, you can start to think about how to reach them. Digital advertising offers a brilliant opportunity to utilize some of the world’s biggest platforms, like social media sites and streaming channels, to boost the visibility of your photography business and display your work in a way that effortlessly grabs a viewer’s attention.
Compared to traditional methods like radio and television advertising, digital alternatives give you the opportunity to tell a powerful story with your content, building a brand identity that is centered around the work you produce. By taking advantage of this, and telling a story through your digital advertising, you can gain online followers who will revisit your site time and time again.
Kelsey- Inselly


