TUTORIALS: DEPTH OF FIELD
Depth of field refers to the range of distance that appears acceptably sharp. It varies depending on camera type, aperture and focusing distance, although print size and viewing distance can also influence our perception of depth of field. This tutorial is designed to give a better intuitive and technical understanding for photography, and provides a depth of field calculator to show how it varies with your camera settings.

The depth of field does not abruptly change from sharp to unsharp, but instead occurs as a gradual transition. In fact, everything immediately in front of or in back of the focusing distance begins to lose sharpness — even if this is not perceived by our eyes or by the resolution of the camera.
CIRCLE OF CONFUSION

Since there is no critical point of transition, a more rigorous term called the “circle of confusion” is used to define how much a point needs to be blurred in order to be perceived as unsharp. When the circle of confusion becomes perceptible to our eyes, this region is said to be outside the depth of field and thus no longer “acceptably sharp.” The circle of confusion above has been exaggerated for clarity; in reality this would be only a tiny fraction of the camera sensor’s area.

When does the circle of confusion become perceptible to our eyes? An acceptably sharp circle of confusion is loosely defined as one which would go unnoticed when enlarged to a standard 8×10 inch print, and observed from a standard viewing distance of about 1 foot.

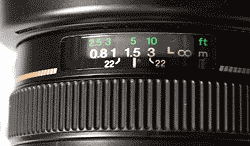
At this viewing distance and print size, camera manufacturers assume a circle of confusion is negligible if no larger than 0.01 inches (when enlarged). As a result, camera manufacturers use the 0.01 inch standard when providing lens depth of field markers (shown below for f/22 on a 50mm lens). In reality, a person with 20/20 vision or better can distinguish features 1/3 this size, and so the circle of confusion has to be even smaller than this to achieve acceptable sharpness throughout.
A different maximum circle of confusion also applies for each print size and viewing distance combination. In the earlier example of blurred dots, the circle of confusion is actually smaller than the resolution of your screen for the two dots on either side of the focal point, and so these are considered within the depth of field. Alternatively, the depth of field can be based on when the circle of confusion becomes larger than the size of your digital camera’s pixels.
Note that depth of field only sets a maximum value for the circle of confusion, and does not describe what happens to regions once they become out of focus. These regions are also called “bokeh,” from Japanese (pronounced bo-ké). Two images with identical depth of field may have significantly different bokeh, as this depends on the shape of the lens diaphragm. In reality, the circle of confusion is usually not actually a circle, but is only approximated as such when it is very small. When it becomes large, most lenses will render it as a polygonal shape with 5-8 sides.
CONTROLLING DEPTH OF FIELD
Although print size and viewing distance influence how large the circle of confusion appears to our eyes, aperture and focusing distance are the two main factors that determine how big the circle of confusion will be on your camera’s sensor. Larger apertures (smaller F-stop number) and closer focusing distances produce a shallower depth of field. The following test maintains the same focus distance, but changes the aperture setting:
 f/8.0
f/8.0 f/5.6
f/5.6 f/2.8
f/2.8note: images taken with a 200 mm lens (320 mm field of view on a 35 mm camera)
CLARIFICATION: FOCAL LENGTH AND DEPTH OF FIELD
Note that focal length has not been listed as influencing depth of field, contrary to popular belief. Even though telephoto lenses appear to create a much shallower depth of field, this is mainly because they are often used to magnify the subject when one is unable to get closer. If the subject occupies the same fraction of the image (constant magnification) for both a telephoto and a wide angle lens, the total depth of field is virtually* constant with focal length! This would of course require you to either get much closer with a wide angle lens or much farther with a telephoto lens, as demonstrated in the following chart:
| Focal Length (mm) | Focus Distance (m) | Depth of Field (m) |
|---|---|---|
| 10 | 0.5 | 0.482 |
| 20 | 1.0 | 0.421 |
| 50 | 2.5 | 0.406 |
| 100 | 5.0 | 0.404 |
| 200 | 10 | 0.404 |
| 400 | 20 | 0.404 |
Note: Depth of field calculations are at f/4.0 on a camera with a 1.6X crop factor,
using a circle of confusion of 0.0206 mm.
Note how there is indeed a subtle change for the smallest focal lengths. This is a real effect, but is negligible compared to both aperture and focusing distance. Even though the total depth of field is virtually constant, the fraction of the depth of field which is in front of and behind the focus distance does change with focal length, as demonstrated below:
| Distribution of the Depth of Field | ||
|---|---|---|
| Focal Length (mm) | Rear | Front |
| 10 | 70.2 % | 29.8 % |
| 20 | 60.1 % | 39.9 % |
| 50 | 54.0 % | 46.0 % |
| 100 | 52.0 % | 48.0 % |
| 200 | 51.0 % | 49.0 % |
| 400 | 50.5 % | 49.5 % |
This exposes a limitation of the traditional DoF concept: it only accounts for the total DoF and not its distribution around the focal plane, even though both may contribute to the perception of sharpness. Note how a wide angle lens provides a more gradually fading DoF behind the focal plane than in front, which is important for traditional landscape photographs.
Longer focal lengths may also appear to have a shallower depth of field because they enlarge the background relative to the foreground (due to their narrower angle of view). This can make an out of focus background look even more out of focus because its blur has become enlarged. However, this is another concept entirely, since depth of field only describes the sharp region of a photo — not the blurred regions.
On the other hand, when standing in the same place and focusing on a subject at the same distance, a longer focal length lens will have a shallower depth of field (even though the pictures will frame the subject entirely differently). This is more representative of everyday use, but is an effect due to higher magnification, not focal length.
Depth of field also appears shallower for SLR cameras than for compact digital cameras, because SLR cameras require a longer focal length to achieve the same field of view (see the tutorial on digital camera sensor sizes for more on this topic).
*Technical Note: We describe depth of field as being virtually constant because there are limiting cases where this does not hold true. For focal distances resulting in high magnification, or very near the hyperfocal distance, wide angle lenses may provide a greater DoF than telephoto lenses. On the other hand, at high magnification the traditional DoF calculation becomes inaccurate due to another factor: pupil magnification. This reduces the DoF advantage for most wide angle lenses, and increases it for telephoto and macro lenses. At the other limiting case, near the hyperfocal distance, the increase in DoF arises because the wide angle lens has a greater rear DoF, and can thus more easily attain critical sharpness at infinity.
CALCULATING DEPTH OF FIELD
In order to calculate the depth of field, one needs to first decide on an appropriate value for the maximum allowable circle of confusion. This is based on both the camera type (sensor or film size), and on the viewing distance / print size combination. Needless to say, knowing what this will be ahead of time often isn’t straightforward. Try out the depth of field calculator tool to help you find this for your specific situation.
DEPTH OF FOCUS & APERTURE VISUALIZATION
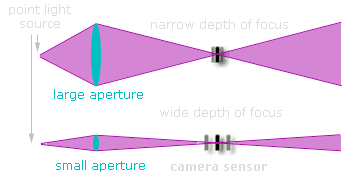
Another implication of the circle of confusion is the concept of depth of focus (also called the “focus spread”). It differs from depth of field because it describes the distance over which light is focused at the camera’s sensor, as opposed to the subject:

Diagram depicting depth of focus versus camera aperture. The purple lines comprising the edge of each shaded region represent the extreme angles at which light could potentially enter the aperture. The interior of the purple shaded regions represents all other possible angles.
The key concept is this: when an object is in focus, light rays originating from that point converge at a point on the camera’s sensor. If the light rays hit the sensor at slightly different locations (arriving at a disc instead of a point), then this object will be rendered as out of focus — and increasingly so depending on how far apart the light rays are.
OTHER NOTES
Why not just use the smallest aperture (largest number) to achieve the best possible depth of field? Other than the fact that this may require prohibitively long shutter speeds without a camera tripod, too small of an aperture softens the image by creating a larger circle of confusion (or “Airy disk“) due to an effect called diffraction — even within the plane of focus. Diffraction quickly becomes more of a limiting factor than depth of field as the aperture gets smaller. Despite their extreme depth of field, this is also why “pinhole cameras” have limited resolution.
For macro photography (high magnification), the depth of field is actually influenced by another factor: pupil magnification. This is equal to one for lenses which are internally symmetric, although for wide angle and telephoto lenses this is greater or less than one, respectively. A greater depth of field is achieved (than would be ordinarily calculated) for a pupil magnification less than one, whereas the pupil magnification does not change the calculation when it is equal to one. The problem is that the pupil magnification is usually not provided by lens manufacturers, and one can only roughly estimate it visually.
– Originally posted on Photography Tutsplus


5 thoughts on “TUTORIALS: DEPTH OF FIELD”
Great article. Good to understand for everyone.
Thanks for the.. It brings light into the dark!
What an awesome way to explain this-now I know everithyng!
Tremendous things here. I’m very glad to see your article. Thanks a lot and i am looking forward to contact you. Will you please drop me a mail?
Enjoyed reading through this, very good stuff, thankyou .