
Updates for Adobe Video Apps CC 2018 – Features Explained
With NAB Las Vegas looming around the corner (7-12 April, which we will cover as usual in detail with lots of coverage!), Adobe is announcing the new features in its line-up of video apps, available today as an update through Creative Cloud. Here is a run-through regarding the biggest updates of CC 2018.
The biggest innovation for this release, without question, is the AI-powered Shot Matching & Scene Comparison that allows for probably easier-than-ever shot-to-shot color correction, right within Premiere Pro CC. But don’t miss out on other new features, including auto-ducking, Premiere Pro project integration within Audition CC and the tighter integration with Master Properties in After Effects supported through the enhanced Essential Graphics Panel in Premiere Pro CC. Oh, and did we mention Canon CRM support (for C200/C700)? Let’s have a look …
More content, less time
With an unparalleled integrated suite of video applications, Adobe continues to cater to the professional content creators who find themselves confronted with the necessity to create more content in less time. Clients want more video and they want it now, in various formats, languages and targeted at different audiences, devices and regions. Workflows need to accommodate for these demands of high quality content and Adobe clearly shows that it listens to its users.
In traditional workflows color correction and grading is done after the offline edit has been locked and the online process begins. As the content production pipelines become ever more compressed, grading-as-you-go is the new name of the game. The same applies to the need for auto-ducking of audio levels and for Master Properties that affect all linked compositions in After Effects and seamlessly integrate with Premiere Pro CC. A common theme for this release cycle is dubbed by Adobe as “Powerful Alone, Unstoppable Together”. Word.
Adobe Premiere Pro CC
With this update, Adobe harnesses the power of its artificial intelligence (AI) engine Sensei (https://www.adobe.com/sensei.html) in multiple ways inside Adobe Premiere Pro CC 2018. By far the biggest new feature is the new Shot Matching & Scene Comparison feature within the Lumetri color engine. This makes it much easier to create a uniform look between scenes shot on various days and lighting conditions, different camera models or even looks based on still images captured from any source. Although the one-click button does appear to work like magic, all of the individual parameters affected by the engine can be further tweaked by the user, thus giving you absolute creative control. It works non-destructively so you can always go back and change things.
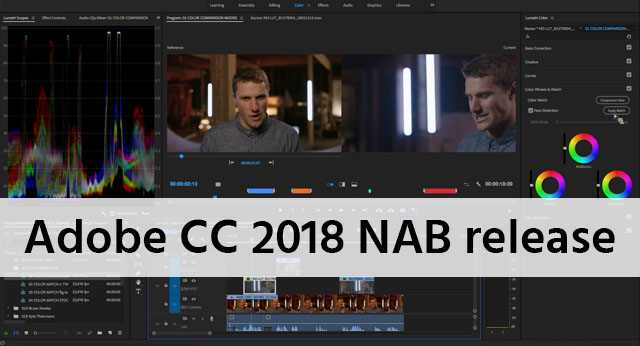
Shot Matching & Scene Comparison
A feature that was once part of Adobe Speedgrade – Comparison View – is now integrated right inside Premiere Pro CC. This immediately brings up a second image in the timeline. The left image can be dragged to any point in the sequence, which can be a shot from any visual source (including reference images supplied by the producer!), as long as it is included somewhere on the timeline. With the Lumetri Color effect applied, you can then access the Color Wheels & Match section and hit the Apply Match button and let Sensei do the magic. A Face Detection option allows for telling this feature that skin tones are included in the scene. Almost instantly, after the analysis, the auto-match feature changes the parameters of the color wheels included below the new button. This is great, because it allows for further adjustment by the editor. It all works non-destructively, so nothing is baked-in until you render it out.
Auto Audio Ducking
A much-requested feature is the ability to apply automatic audio ducking, the process of lowering the audio levels so that speech becomes audible against background music or sound effects. As of this release, Audio Ducking is now part of the Essential Sound panel in Premiere Pro CC. This is a huge time-saver as well for editors, who previously had to manually incorporate a lot of keyframes in the timeline to achieve the same effect. Much like the Shot Matching feature, Adobe has integrated the Sensei machine learning technology with this effect, making it not only an automated keyframe generation process, but also an intelligent one. Users can choose against which source the ducking needs to be done, as well as the level of sensitivity in which the feature works, the dB level of reduction as well as how fast the fades apply. Again, after the button Generate Keyframes has been pushed, the keyframes are automatically placed on the targeted audio tracks, ready for further fine-tuning by the editor (if desired).
Copy Paste Includes Sequence Markers
When you have meticulously added sequence markers to footage on the timeline, upon copying these clips to another sequence, they used to disappear. Quite annoying. Not any longer. Under the Markers menu, you can choose to activate Copy Paste Includes Sequence Markers to get them ported over to the next sequence. Neat.
Adobe Audition CC
Although most of the audio editing work can now be done right inside Premiere Pro CC, including the new auto-ducking feature discussed above, Adobe Audition CC still is an application that is better tailored to the task than a video editing application. Think of detailed audio clean-up or the manipulation of scores that involve a truckload of different audio tracks.
Open Premiere Pro Sequences in Adobe Audition
Previously, the two applications worked together somewhat, but the Export process from PPro to Au involved multiple steps and the creation of many new instances of rendered audio files. Quite cumbersome and a quick way to get messy projects. The best example of how applications should work in unison, is dynamic linking between After Effects and Premiere Pro.
With this release, Adobe has given us the possibility to open up Premiere Pro project (.pproj) files directly in Audition CC. Not a full round-trip (yet), as you still cannot import Audition CC session (.sesx) files as a single audio track into Premiere Pro, but who knows, maybe that will be possible at some point in the future as well. The path of further Adobe video apps integration is clear, which is great news.
Import Compound Media in Adobe Audition
Also, whereas in the past the audio portion of a video clip used to be extracted to a wave file, as of this release, they remain intact and linked together. You can even twirl out the audio file and see the individual channels that are included.
When you drag new audio clips into the mix, the video player scrubs along with a visual timecode, making the timing of sound effects so much easier.
New Tracks panel in Adobe Audition
Much like the ability to shy specific layers in After Effects, Audition now features a new Tracks panel. This allows you to make certain tracks invisible, meanwhile they do remain audible in the mix. You can use a well-known combination of CTRL/CMD + clicking or SHIFT + clicking to make selections of multiple tracks that you want to hide or vice versa. Such selections can also be assigned to presets, for easy toggling between track selections. This allows the editor to focus on the task at hand (e.g. dialogue versus SFX or score mixing).
More new features in Adobe Audition
Below is an overview of other newly added features in Audition. With the ongoing (or should I say renewed?) popularity of podcasting, Audition now allows for the inclusion of .jpeg and .png files as part of the .mp3 podcast file. Nothing fancy, but handy nonetheless. Another cool feature is the ability to Run scripts, so you can make repetitive tasks easier.
Adobe After Effects CC
This NAB, Adobe is celebrating 25 years of their leading visual effects platform, After Effects. Being an industry standard, AE is used in most productions, ranging from high quality Netflix shows like Stranger Things, but also major blockbusters like Blade Runner 2049, Guardians of the Galaxy vol. 2 and Pacific Rim Uprising. This release includes some major improvements that help to make life easier for the VFX artist.
Master Properties in After Effects
Organization is key for motion graphics artists. The ability to see how various compositions (Comps and Pre-Comps) affect one another, so that AEP files may be shared easier with others (and they subsequently ‘get’ your method), is what separates the men from the boys in motion graphics. Even with animations that appear simple, things can get complicated fast (or downright incomprehensible) in After Effects.
You can now streamline your motion graphics workflow by creating compositions with Master Properties. Add layer properties, such as position, color or text, in the Essential Graphics panel and control them in the parent composition’s timeline. Using the two new Master Properties buttons to either push individual values to all versions of the composition or pull selected changes back to the master. This promises to be a whole new way of working in After Effects CC.
Data Driven Animation updates in After Effects
Another cool thing is that you can easily create – and change – animations that are driven by data. Provided that the build-up of source data is comparable, you can now create multiple animations and merely replace the data file, holding the ALT or Option key while dragging a new JSON or CSV data file inside the composition. Pretty cool stuff.
Advanced Puppet Engine in After Effects
The Puppet Tool has been revamped as well in this new release and is now dubbed the Advanced Puppet Engine. The pins now move much more organic than previously, thus requiring you to add less pins. For areas that should not be affected as much, you can use the new Starch tool.
Other enhancements in After Effects
Among many other new features, the Add Grain, Remove Grain and Match Grain effects are now multi-threaded, giving you up to 5x faster performance. Also, there’s an enhanced disk cache management feature and a new shortcut that allows you to easily cycle through mask modes.
Still on the wishlist
With this release, Adobe once again is making life easier for the video professional. You can do more in less time with each individual application, while they work better in concert as well. Nonetheless, there are still a number of areas that Adobe should consider working on.
Here’s my personal top 5 for Adobe Premiere Pro:
1. Guidelines in Program monitor
What happens in most Adobe apps (Photoshop, Illustrator, After Effects) when you hit the key combination CTRL/CMD+R? Guidelines are shown, which allow you to drag out lines on the canvas you’re working on and use a Snap to guidelines (S) to quickly put elements in the correct spot. This is not the case in Premiere Pro. Strange, especially since the new type tool allows you to start typing away directly in the Program Monitor (since CC2017), thus creating a new text item. But without guidelines, you only have the Safe Margins feature to gauge the correct position of that lower third (or any other element).
2. Reverse keyframes in Effect Controls
If you’ve ever created any kind of effect on your footage, you frequently find yourself introducing the effect and then later on taking it away by manually reversing the keyframes. After Effects offers a quick and easy way to reverse keyframes using the Keyframe Assistant in the context menu. Premiere Pro should have this as well.
3. Audition-style gain handles on audio
Adobe Audition allows you to easily create gain effects using slopes at the start or end of an audio clip. Place two clips on top of each other and you can easily determine how one clip segues into the other. With the new release, thanks to the ability to open up .pproj in Audition, you can do this fine-tuning easier inside Audition, but it should be made available inside Premiere Pro as well.
4. Fix by nesting
When you create a custom sequence (e.g. a ‘cinematic’ timeline of 1920×815 pixels) or when you bring in 4K footage on a 1080p timeline, effects like the Warp Stabilizer will quickly give you a warning that the effect cannot be applied to a timeline that does not match the source footage. It tells you to fix this by nesting, but the program does not help you realize this. This can be vastly improved.
5. Project Manager that works
If you’ve ever used the Project Manager function in Premiere Pro for trimming down projects and subsequent archiving on external disks, you may have discovered a few years later on that some files are missing. This is because the feature only works skin deep. Many projects include dynamically linked files, most notably those from After Effects. When using the Project Manager, although the linked AEP files may be copied over, any source footage within these AEP files are not. Not a good sign when that client logo is missing in the Title animation. As the Adobe apps become more and more intertwined, a Project Manager function that crawls through all linked assets and copies over all those associated, becomes ever more crucial.
Full disclosure: the author of this article is involved with Adobe as ACP (Adobe Creative Professional). However, this post is in no way sponsored or endorsed by Adobe.
– Originally posted on Cinema5D


2 thoughts on “Updates for Adobe Video Apps CC 2018 – Features Explained”
Hey webmaster
When you write some blogs and share with us,that is a hard work for you but share makes you happly right?
yes I am a blogger too,and I wanna share with you my method to make some extra cash,not too much
maybe $100 a day,but when you keep up the work,the cash will come in much and more.more info you can checkout my blog.
good luck and cheers!
Undeniably believe that which you said. Your favorite justification appeared to be at the internet the simplest thing to be mindful of. I say to you, I certainly get annoyed whilst people think about issues that they plainly don’t understand about. You controlled to hit the nail upon the highest and defined out the entire thing with no need side-effects , other folks could take a signal. Will probably be again to get more. Thanks